Safety
Click on Services and then on Security
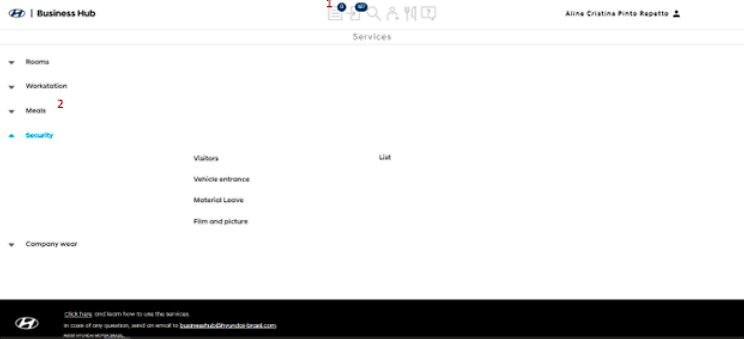
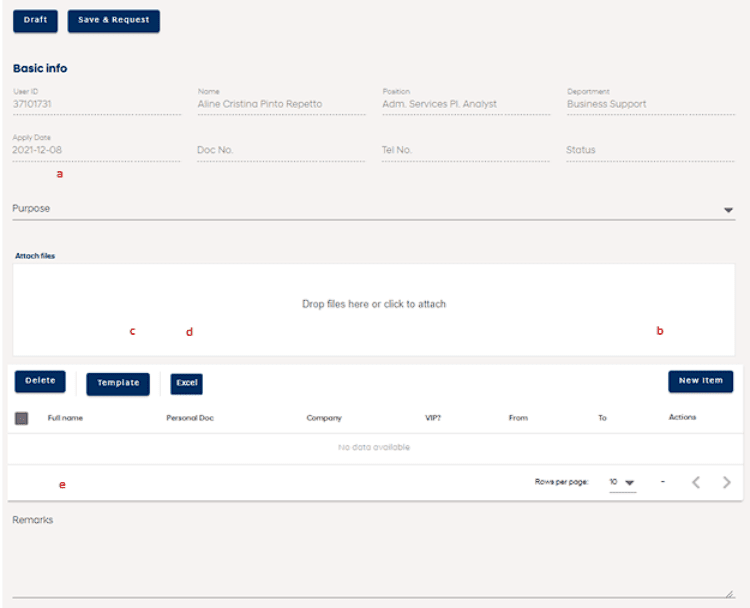
Request Guest Entry
Access the Visitors menu.
a) On the request screen, choose the purpose of the visit.
b) Click on New Item to add visitors and fill in the required fields.
c) If there are many visitors to be registered, it is possible to download the standard file to fill in and then upload the information in a unique way. To download the default file, click Template.
The file has the first line filled in as an example that must be replaced by the correct data.
Full_Name – Visitor’s full name.
Personal_Doc – Visitor ID number.
Company – Company where the visitor works.
Is_Vip – Enter 0 if you are not a VIP visitor and 1 if you are a VIP visitor.
Vehicle_Access – Populate only if the Is_Vip column is 1 (VIP). Enter 0 for visitor without vehicle access and 1 for visitor with vehicle access.
Vehicle_Plate – Populate only if the Is_Vip column is 1 (VIP). Fill in the license plate of the vehicle that will access the HMB.
Arrival_Forecast – Populate only if the Is_Vip column is 1 (VIP). Fill in the estimated time of arrival. Fill in the field as text, using the apostrophe before the time.
From – Release start date. Fill in the field as text, using the apostrophe before the date and respecting the pattern yyyy-mm-dd.
To – Release end date. Fill in the field as text, using the apostrophe before the date and respecting the pattern yyyy-mm-dd.
Card_delivery_place_id – Populate only if the Is_Vip column is 1 (VIP). These are the places available for handing over the badge to visitors. The numbers to be used should be consulted with the property security team.
d) To load the Excel spreadsheet filled with all visitors, click on Excel, locate the file (which must be without document security) and then click on Open.
e) Observations: field for filling in various information.
After all data is filled in, click on Save & Request. If you just want to save the file to send for approval or release later, click Draft.

Request Vehicle Entry
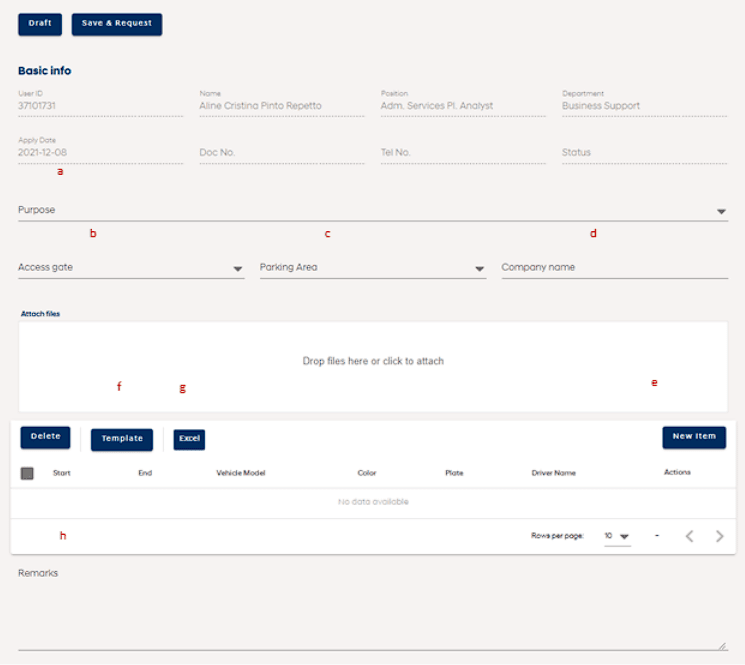
Access the Vehicle Entry menu.
a) On the request screen, choose the purpose.
b) Choose by which entrance the vehicle will access the HMB.
c) Choose which area the vehicle will park.
d) Enter the name of the company that will access the HMB with the vehicle.
e) Click on New Item to add the vehicles and fill in the required fields.
f) If there are many vehicles to be registered, it is possible to download the standard file to fill in and then upload the information in a unique way. To download the default file, click Template.
The file has some lines filled in as an example that should be replaced with the correct data.
Start – Release start date. Fill in the field as text, using the apostrophe before the date and respecting the pattern yyyy-mm-dd.
End – Release end date. Fill in the field as text, using the apostrophe before the date and respecting the pattern yyyy-mm-dd.
Color – Vehicle color.
Plate – Vehicle license plate.
Driver Name – Driver’s full name.
g) To load the Excel spreadsheet filled with all visitors, click on Excel, locate the file (which must be without document security) and then click on Open.
h) Observations: field for filling in various information.
After all data is filled in, click on Save & Request. If you just want to save the file to send for approval or release later, click Draft.

Request Material Output
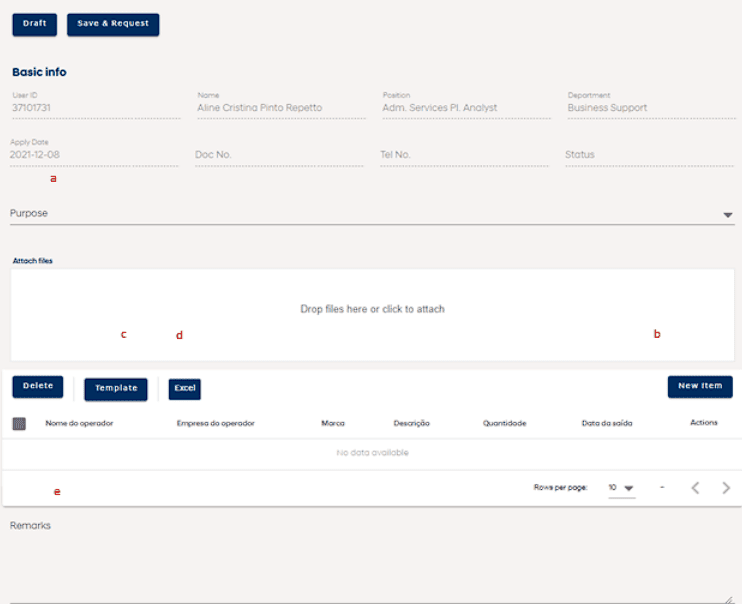
a) On the request screen, choose the purpose.
b) Click on New Item to add the materials and fill in the required fields.
c) If there are many materials to be registered, it is possible to download the standard file for completion and then upload the information in a unique way. To download the default file, click Template.
The file has some lines filled in as an example that should be replaced with the correct data.
Carrier_Name – Name of the person who will carry the material.
Carrier_Company – Name of the company from which the material will be shipped.
Brand – Brand of the material.
Description – Description of the material.
Quantity – Quantity.
Leave Day – Date on which the person will leave with the material. Fill in the field as text, using the apostrophe before the date and respecting the pattern yyyy-mm-dd.
d) To load the Excel spreadsheet filled with all visitors, click on Excel, locate the file (which must be without document security) and then click on Open.
e) Observations: field for filling in various information.
After all data is filled in, click on Save & Request. If you just want to save the file to send for approval or release later, click Draft.

Request Photo and Film Permission
Access the Photo & Movie menu.
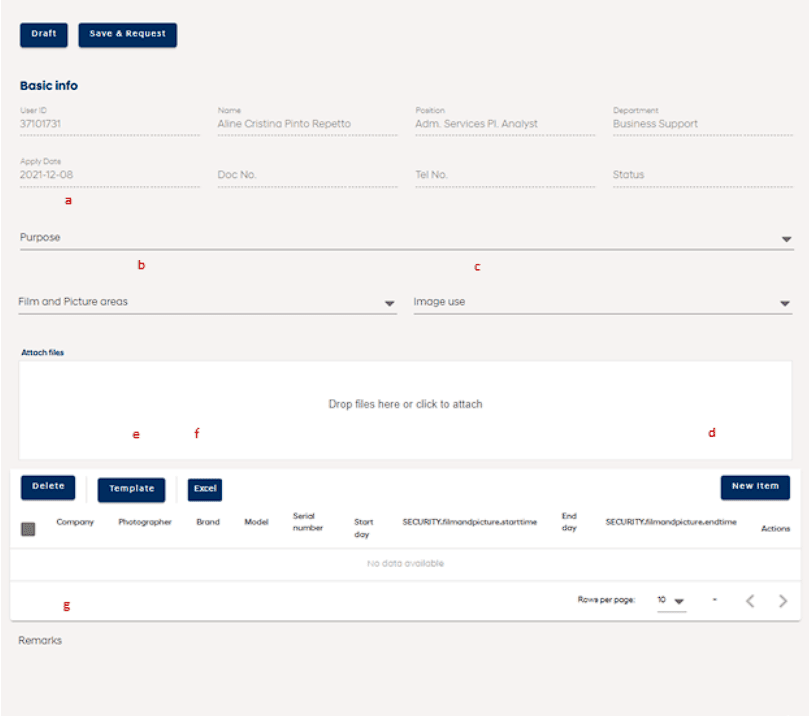
a) On the request screen, choose the purpose.
b) Choose the area to be photographed and/or filmed.
c) Choose whether the image will be used internally or externally.
d) Click on New Item to add the data of who will photograph and/or film and fill in the requested fields.
e) If there are many registered, it is possible to download the standard file for filling and then upload the information in a unique way. To download the default file, click Template.
The file has some lines filled in as an example that should be replaced with the correct data.
Company – Name of the company that will make the photographic/filming records.
Photographer – Name of the person who will make the photographic/filming records.
Brand – Brand of the equipment that will be used.
Model – Model of the equipment that will be used.
Serial – Serial number of the equipment to be used.
Start_day – Start date of records. Fill in the field as text, using the apostrophe before the date and respecting the pattern yyyy-mm-dd.
Start_time – Start time of records.
End_day – End date of records. Fill in the field as text, using the apostrophe before the date and respecting the pattern yyyy-mm-dd.
End_time – End time of records
f) To load the Excel spreadsheet filled with all visitors, click on Excel, locate the file (which must be without document security) and then click on Open.
g) Notes: field for filling in various information.
After all data is filled in, click on Save & Request. If you just want to save the file to send for approval or release later, click Draft.

Cancel Requests
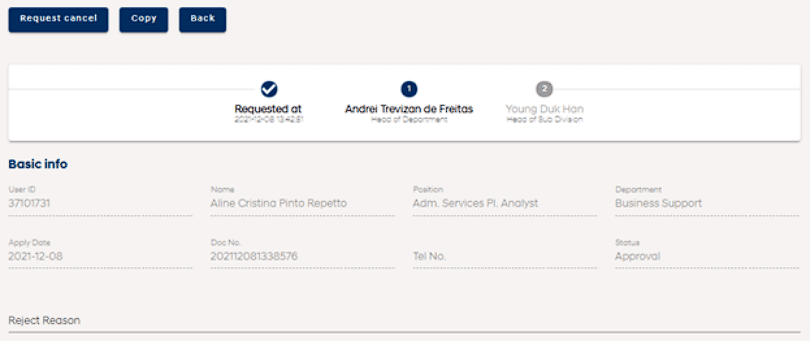
The user must access the Requisition List menu, choose the desired scope (visitors, entry of vehicles, etc.) and click on Search. Click on the request you want to cancel to open it and click on the Cancel Request button.
Delete Requisitions
Only requests in SAVE status can be deleted. For this, the user must access the Requisition List menu, click on the requisition that he wants to delete so that it is opened and then click on Delete.
Consult Approver
If you want to consult the requisition approver, the user must open the requisition through the Requisition List menu.
Copy Requisition
The applicant may copy a request already made. For this, the user must access the Requisition List menu, click on the requisition that he wants to copy so that it is opened and then click on Copy. A new request will be opened with the same information as the previous request.
To change the release date, click the pencil in the last column of the row.


