Business card
Click on Services and then on Business Card.

Request Business Card
Access the Request menu.
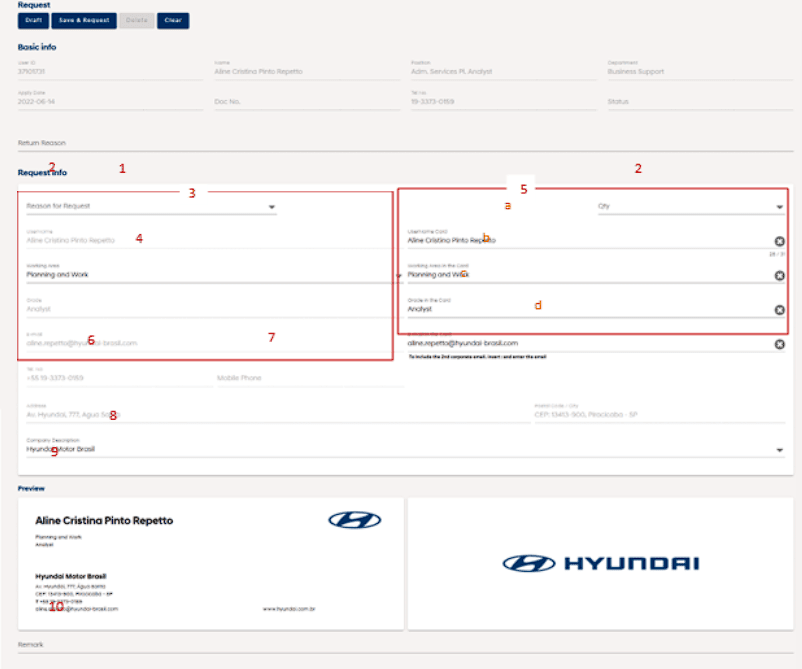
1. Choose the reason for requesting the card.
2. Choose the amount of card requested.
3. The table shows the information as registered by HR in SAP and which is the standard information for issuing the business card.
4. It is possible to choose between the options within the division in which the employee is registered.
5. The table shows the data that will be printed on the card and will appear on the viewing screen (item 8). The fields are automatically filled in with the default information, but they are editable fields.
a) Name: it is possible to change the name by making necessary abbreviations.
b) Work area: when changing the area of the left field, the system will ask if you want to make the change in this field on the right as well, but it is possible to type if necessary. All changes made in this field will be forwarded via the system for approval by HR.
c) Position: it is possible to change the job description if necessary. All changes made in this field will be forwarded via the system for approval by HR.
d) E-mail: it is possible to add another corporate e-mail if necessary; for this the user must enter “ ; ” (semicolon) and enter the desired email.
6. Corporate landline: registration is carried out in SAP by HR.
7. Corporate cell phone: registration is carried out in SAP by HR.
8. Description of the company: it is possible to choose the company according to available options and needs.
9. Preview: this is an example of how the card will be printed.
10. Note: free-fill field to include general information.
All requests will undergo approval by the applicant’s HOD and validation by the service manager.
Note: if the Save & Request does not have a budget, the system will save the request so that, after the budget is regularized, you do not need to do the whole process again. The saved request can be consulted through the Request List menu or the top icon of Requests in Progress.

Cancel Requests
The user must access the Requisition List menu and can cancel in three ways:
a) Accessing the Requisition List menu, selecting the requisition(s) you wish to cancel and clicking the Cancel Requisition button.
b) Clicking on the requisition to open it and clicking on the Cancel Requisition button.
c) On the upper system icon, under Requests in Progress, locating the requisition, clicking on the requisition to open it and clicking on the Cancel Requisition button.
Change Requisitions
It is only allowed to change requests in Save status, which have not been sent for approval. To change requests already submitted, it is necessary to cancel the previous request and open a new request with the new information.
Delete Requisitions
Only requests in SAVE status can be deleted. For this, the user must access the Requisition List menu or through the Requests in Progress icon at the top of the system, click on the requisition that he wants to delete and then click on Delete.

